Follow this link, if you are looking the first Part of the Zul’Gurub Boss Guide, the High Priests of Zul’Gurub.
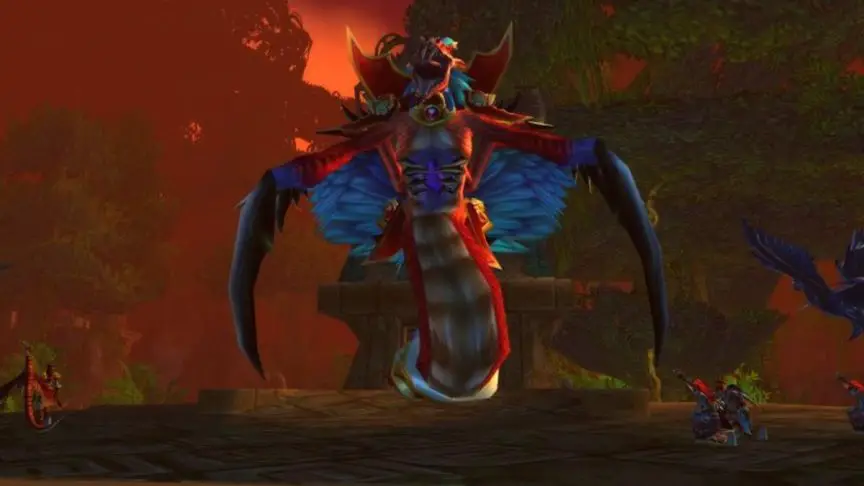
Hakkar, the Soulflayer – boss guide
- The Main Tank will get Mind Controlled and needs to be CCed as fast as possible. This is also why there are 3 Tanks required for this encounter.
- Warriors in the Group need to use their Intimidating Shout on cooldown, so that they don’t Fear the whole Raid when they are Mind Controlled.
- Hakkar will cast Corrputed Blood on a raid member, which will spread to other nearby players and needs to be cleansed. This is why the Raid needs to be a spread out as possible.
- Every 90 seconds, Hakkar will enter a state of Blood Siphon. This is the most important part of the fight. It will stun everyone in front of the boss and drain their life, healing her.
- Players who are affected by Poisonous Blood and Blood Siphon at the same time will damage the boss instead. Poisonous Blood is a debuff acquired from the clouds that the Sons of Hakkar drop when they die. The Sons of Hakkar are located on the platforms left and right of the Boss.
- At the start of the fight, one of the Sons should be pulled and CCed with Hibernate or similar Abilities, then killed before the first Blood Siphon. All Player should acquire the debuff to damage Hakkar, who will then remove the debuff.
- Immediately afterwards, the second Son should be pulled and CCed, for the second Blood Siphon. This leaves a window of just above 4 Minutes to kill Hakkar. She needs to die before the third Blood Siphon.
Optional Bosses and Encounters in Zul’Gurub
Bloodlord Mandokir Guide
- First off, you don’t want to die during this fight especially. This is because you will get resurrected and the Boss will gain experience. Once 3 Players have died, he will gain a Level, increasing his damage done and decreasing his damage taken.
- He has a Whirlwind Ability, which will kill the Melees if they don’t run away. So do it! Run away when he uses it.
- When he uses his Threatening Gaze, Mandokir will look at a random Raid member. This person must immediately stop everything and stand still, or they will be killed quickly.
- If the Tank gets targeted by this, the Raid needs to slow down DPS to make sure Aggro is not lost.
- He will also sometimes Charge a random Player, which is located away from the group. This should be handled by keeping the Raid cuddling together, except for one Player, preferably a Hunter.
- This will also reset the Aggro completely, meaning that the DPS will need to stop once more to let the Tank gain Aggro again.
- Apart from these 2 Abilities, there is also Mandokirs Raptor, who needs to be tanked by 2 Offtanks who will needs to switch every 4-5 Stacks of the debuff they get.
- Once the Raptor is dead, it will send the Boss into an enrage, vastly increasing his damage. Defensive Abilities should be used during this enrage.
- Also, make sure to kill the Speaker before starting the fight.
Jin’do the Hexxer boss guide
- Make sure to always use AoE Fear Abilities and similar on Cooldown, since there will be lots of mind controls throughout the fight, and you don’t want the whole Raid to get CCed.
- Shades of Jin’do are adds that interrupt spellcasting and should always be killed with priority. They can only be killed by Players with the Curse Delusions of Jin’do though, so this should not be dispelled!
- The next priority is the Powerful Healing Ward, which will restore around 3% of his health every tick. This is why a Rogue with Wound Poison on the Boss is very helpful to reduce this amount.
- If there are no Shades and no Healing Totems, the Raid should now watch out for Brain Wash Totems and destroy them. This is the Mind Control mechanic I mentioned earlier.
- Jin’do should only be attacked if there are no shades or totems alive, making this quite a slow fight.
- Another way to combat the totems is to use Mana Draining Abilities, as he won’t place the totems if he doesn’t have the Mana.
- Jin’do will sometimes Teleport a random Player into a pit with Skeletons. Ideally, you want to place 2 Mages here to kill them.
- Jin’do will hex the Main Tank and target the next highest target in Aggro, which is why the Offtanks will need to watch out for this.
Gahz’ranka

Summoning the Boss
- A Player will need to pick up Nat’s Measuring Tape at Nat Pagle’s fishing spot near the water west of High Priest Thekal.
- This Person will need to have a Fishing skill of 300 without any bonuses.
- Then they need to go to Dustwallow Marsh and talk to Nat Pagle to hand in the Quest and purchase a Mudskunk Lure from him.
- Go back to ZG and fish inside the Muddy Churning Waters to catch 5x Zulian Mudskunk. 350 Fishing skill is required to catch these.
- Go back to Nat’s Fishing spot and add the Fish to the Lure. It will instantly be cast into the water and Summon the Boss
Killing Gahz’ranka
- It is recommended to fight Gahz’ranka in the water, is this will completely negate any fall damage.
- Make sure to clear any fish or mobs near the spot where you will fight the Boss.
- Everyone should gather behind the Boss and make sure to give the Tank enough time to grab the Aggro after each Knockup of Massive Gayser.
Edge of Madness
Summoning one of the Bosses
- You will need a Gurubashi Mojo Madness to summon one of the four Bosses. Only one of the Bosses will spawn each Raid lockout.
- To make the Mojo, a 300 Skill Alchemist can learn the recipe at the tablet near the Brazier. He will need to following ingredients:
- 6x Powerful Mojo,
- 1x Black Lotus
- 1x Blood of Heroes
- 1x Massive Mojo
- Use the Gurubashi Mojo Madness at the brazier to summon the Boss
Wushoolay
- Hunters and Warlocks will need to drain Wushoolay’s Mana.
- He will cast Lightning Clouds that should be avoided by Players. The tank should move the Boss out of these Clouds while the Melees stay behind him.
- Rangers should spread out as much as possible.
- An Aspect of the Wild is highly recommended for the fight, as the Boss has an Aura of Poison.
Renataki
- This is the easiest of the four fights. Have 2 camps, a Range and a Melee Camp
- He will Gouge nearby targets and then Vanish. His stealth can be broken with AoE attacks.
- After a time, Renataki will attack a random raid member. Casters will most likely die from this, but if the tank is quick enough to grab him, they might not.
Hazza’rah
- He has an AoE Sleep Ability, Casters and Rangers should stay out of Melee range at all times. Make sure the tank doesn’t die while he is sleeping.
- Hazza’rah will spawn Illisions of himself, who deal very high damage but have quite low Health. They need to be focused down as quick as possible, ideally by dedicated range DPS, so they won’t fall asleep.
- He also has a Mana Burn, which will quickly render your healers and casters useless. To deal with this, Hunters and Warlocks will once more need to use their Mana Draining Abilities.
Gri’lek
- Casters and Rangers should spread out for this fight.
- Gri’lek will periodically grow in size and target random Raid Members. This will reset Aggro and reduce his Movement Speed by quite a lot.
- The targeted Raid Member will need to stay out of range, so they don’t get one shot by Gri’lek.
- He will also Root Raid Members, which can cause them to get hit by Gri’lek when they are focused by him. This is why the Root debuff needs to be dispelled as quick as possible.
This marks the end of our Zul’Gurub Boss Guide! Have fun raiding.
